Frontend testing with MTA
This section describes how to create a frontend test in MTA, by adding the prerequisite modules to a Mendix project.
This part of the documentation is currently incomplete. It will be incrementally updated in the following weeks.
Menditect uses the Playwright runtime to execute these frontend tests. Playwright is a library with which you can locate elements on a web page and execute actions on these elements. See https://playwright.dev/java/ for the relevant documentation.
Prerequisites
Download below modules from the Mendix marketplace to enable frontend testing.
If you want access to these modules, please contact support.
- The Playwright Connector
- The Playwright UI Test Kit
- The MTA Plugin
Playwright Connector
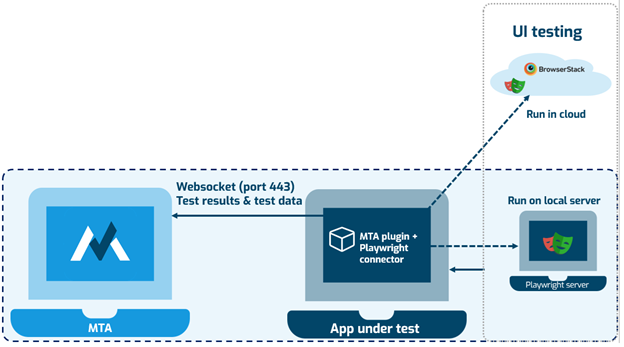
The Playwright Connector makes it possible to define and run a frontend test from any Mendix App. It enables the App to connect to the Playwright server, based on specified connection settings, and execute the test. When executing a UI test, Playwright starts and hosts its own browser. This can be Chromium, Firefox or Webkit. In order to do this, Playwright needs to load required dependencies and, therefore, it needs the right permissions on the host server. In the image below, you can see how Playwright can be hosted on remote servers, either in the cloud or on a local server.
The Playwright Connector includes Locator microflows to find elements on a webpage, and Action microflows to click on elements, fill them with text, or select a value. Therefore it can be used to test any webapplication, not just Mendix Apps. Locator and Action microflows in the Playwright Connector can be defined and executed from MTA.
UI Test Kit
The UI Test Kit is meant specifically to define and run frontend tests for Mendix apps. It contains Reusable Locator and Action microflows to test Mendix Platform Supported Widgets.
A few notes about the UI Test Kit:
- The UI Test Kit currently has the en-US and nl-NL languages built-in.
- React-enabled projects can be tested by setting the Constant IsUsingReactClient to True.
- Although more Widgets may be added as supported in the UI Test Kit, any changes made in the future can break Locating a Widget correctly.
Get started
- Start by importing the Playwright Connector. This module requires the playwright driver bundle jar file in your userlib directory if you want to run Playwright on your local machine. Download the jar file here: https://repo1.maven.org/maven2/com/microsoft/playwright/driver-bundle/1.53.0/driver-bundle-1.53.0.jar
- Download the UI Test Kit module to start testing the most common Mendix Widgets. This module requires the Apache Commons Lang jar file in your userlib directory. Download the jar file here: https://repo1.maven.org/maven2/org/apache/commons/commons-lang3/3.12.0/commons-lang3-3.12.0.jar
- Add both the Module Roles to the project's User Roles.
- Download and import this Snippet into your Mendix App, add it to a Page that is accessible for Users that will be evaluating executed frontend Tests.
Test structure
Each frontend test has the same basic structure:
- Start Test
- Locators and Actions
- Stop Test
Setup (local testing)
Playwright can be hosted locally with the Mendix App running in Studio Pro (e.g. localhost). For this, you only need to add the necessary jar file (driver-bundle.jar) to the /userlib folder of the Mendix project. If this jar file is added to the Mendix project and the app is deployed to a local server that allows Playwright to load the dependencies it needs, this is sufficient for executing the Test Cases. Separate hosting of the Playwright browsers is not needed then. However, if the jar-file is not added and/or the local server is also limited in the access it requires for Playwright to load its dependencies, it is needed to host a Playwright server elsewhere.
The Mendix Cloud currently does not allow for third party frameworks, like Playwright, to load its own dependencies. This is why it is currently not possible to use UI testing in MTA when the app under test is hosted in the Mendix Cloud.
|
Setup (running Playwright in Browserstack)
One alternative option to hosting Playwright locally is to use Browserstack. BrowserStack is a cloud-based testing platform that enables developers and QA teams to test applications across various browsers and devices. It offers native support for Playwright, allowing users to run automated end-to-end tests on real devices and browsers within its cloud infrastructure.
To test using BrowserStack, replace the call to the "Create_Browser" microflow, with a call to the "Connect_BrowserStack" microflow.
Currently, using Browserstack is only supported if the Mendix App is running in the cloud. Local Testing is currently only supported if Playwright is also running locally. Local Testing with Browserstack will be supported in a future release of the Playwright Connector.
Setup (running Playwright in a Docker container)
This chapter describes the situation where the Test Application is started from Studio Pro, and Docker Desktop is running on the same machine. When running the Test Application in the cloud, the URL in the Navigate action in step 19 will be replaced by the Application URL in the cloud. When running Docker in the cloud, omit the steps to install Docker Desktop, and replace the command in step 9 by the one noted in https://playwright.dev/docs/docker#running-the-playwright-server.
- Install Docker Desktop https://www.docker.com/products/docker-desktop/.
- Although not always required by Docker, restart Windows.
- Start Studio Pro that will run the Test Application and connect to MTA.
- Make sure the Connector and Mx UI Testkit are imported.
- Check the playwright version that is being used by the Connector. This should be noted in the documentation in the Mendix Marketplace.
- Run the Test Application. Check MTA to see if it's connected.
- Run Docker Desktop. No need to sign-in, just click Skip.
- Run a command line prompt (cmd).
- Copy the command line noted here into a text editor (use the copy button): https://playwright.dev/docs/docker#network-configuration.
- Replace the two parts where the playwright version is denoted, by the playwright version in use by the Connector. Example:
docker run --add-host=hostmachine:host-gateway -p 3000:3000 --rm --init -it --workdir /home/pwuser --user pwuser mcr.microsoft.com/playwright:v1.53.0-noble /bin/sh -c "npx -y playwright@1.53.0 run-server --port 3000 --host 0.0.0.0" - Copy and paste the command line in the prompt and press Enter.
This will do three things:
1. download the docker image containing the playwright server
2. run this image in a virtualized Docker container
3. make sure that the hostmachine can be reached from the container. - Wait until it says
Listening on ws://0.0.0.0:3000/in the prompt. - Create a Test Case that uses the Test Application.
- Add a microflow teststep to Start_Playwright_Test.
- Add a microflow teststep to Connect_Playwright_Server, with URL: ws://0.0.0.0:3000/
- Add a microflow teststep to Create_BrowserContext; Viewport can be left empty.
- Add a microflow teststep to Create_Page.
- Add a microflow teststep to Start_Tracing. This is required if you want to visually inspect any of the results, because you cannot view the output of the browser in real time.
- Add a microflow teststep to Navigate. Important: you cannot navigate to localhost, because the localhost will point to inside the virtualized container. You have to navigate to http://hostmachine:8080 (assuming the Test Application is running on port 8080). This will only work if you correctly executed step 10.
- Build your UI test like you otherwise would.
- Make sure to add Page_Screenshot teststeps to check important results.
- Make sure to end with Stop_Tracing and Stop_Playwright_Test.
- Run your test!
- To shutdown the locally running docker container simply press Ctrl+C in the prompt.
Locators and Actions
Generic App testing
To perform an action on an element in the page, the basic structure is to use two microflows; a Locator microflow and an Action microflow. Sometimes calling a second Locator microflow is needed.
In the Playwright Connector, Locator microflows are inside the "Microflows/Commands" folder. The "Get_Locator_By_Page" folder contains Locators that have the complete Browser Page as scope to locate any HTML element. The "Get_Locator_By_Locator" folder contains the same Locators, but using another Locator that narrows the scope within to locate the HTML element. Another way to narrow down the list is using the microflows inside the "Locator_Element_Operations" folder, containing Filters and Nth element locators. In order to use XPath or CSS Locators, use the "...Get_By_Selector" microflows.
Locator Actions are in the "Locator_Actions" folder. Note that some Actions will wait for the element to become visible, others (like "Locator_Element_Count") will be executed immediately. If it is required to wait, it is recommended to use the "Delay after execution" property on the Teststep in MTA that calls the Locator Action microflow.
For more advanced usage, checkout the Playwright documentation for Locators and Actions.
Mendix App testing
In order to identify a Mendix Page, it is necessary to fill in the Page class on the Mendix Page in Studio Pro.
Assign the same Class name on the Page as the Page's Title.
Session handling
The Test Case containing the Teststeps should be using an Account with dedicated UserRoles in the Connector & UI Test Kit Playwright modules (for example, UiTestUser) as an Execution user, with the Apply-security Enabled. Although MTA creates it's own user session to perform actions in a Test Case, it is still necessary to login to the App under test when using MTA.
The upside of the current implementation is that sessions created by Playwright can be carried onto subsequent Test Cases. Just point to the MenditectPlaywrightConnector.Page object that was created in a Test Case, whenever calling a Locator microflow, and the same browser tab will be used to run the test.
When running Playwright on your local machine from Studio Pro, the free license will only allow for so many user sessions. Therefore, a few tips:
- prevent using Anonymous sessions;
- always logout at the end when creating a Playwright session;
- prevent also manually logging in from your own browser;
- restart the App if needed.
Testing Mendix Platform Supported Widgets
Click here to see a list of recent Platform supported Widgets
Testing Custom Widgets and Snippets
Custom Widgets
Mendix will add the "mx-name-widgetName" class to every widget on the Page, so it is always possible to create a Locator for the surrounding HTML element. However in most cases you will want to add another Locator inside that Locator, so define Actions for child elements.
Snippets
Snippets are not rendered as HTML elements by Mendix, even though Mendix does allow for adding a Class to a Snippet.
In order to define Locators for Widgets inside a Snippet, add a surrounding Container rendered as a DIV element, with a representable name, to locate it.
Feedback?
Missing anything? Let us know!
Last updated 5 september 2025