Mendix introduction for testers
Why introduce Mendix to testers?
Mendix provides a low code platform to build apps, based on visual models. The resulting app that is generated from these models is a web application. Therefore, Mendix apps cán be tested as a black box, using generic test automation tools for UI and API testing.
However, one of the benefits of low code platforms - Mendix included - is the speed of development. This results in challenges when it comes to testing: how can testing keep up with the speed of development if you use the generic approach stated above?
The answer is: ’You can’t’. The solution is: ‘Know your platform’.
By having knowledge of the Mendix platform and the way apps are built, you can gain the benefits that are needed to keep up with the pace of development. Key approaches are:
- Shift-left (or: tilt-left)
- Test the right things
Shift left
By testing earlier in the life cycle, short feedback loops can be created. Bugs, omissions and risks can be identified in an early stage, resulting in lower costs and faster solutions. Short feedback loops in Mendix can be achieved in multiple ways. Examples are:
- using Mendix Studio Pro to test in branches
- implement white box testing tools (like Menditect Test Automation (MTA) or, Mendix’ Unit Test Module).
To make these sorts of testing accessible for testers, it is necessary to understand how the internals of a Mendix app work.
Test the right things
It may sound like common sense: an efficient approach means testing the right things. With a low code tool like Mendix, a large part of ‘knowing what to test’ means ‘knowing what not to test’. This can only be achieved by having knowledge of how a Mendix application is built and what has already been tested by the white box testing tools.
About this document
Although the Mendix platform is well documented, freely accessible and relatively easy to learn for non technical developers, most existing documentation is aimed at developers and not at testers. This document provides an introduction to Mendix for testers to make the structure of the Mendix models more accessible for them so that they can increase the efficiency of their test approach.We cover aspects like the UI, data and application logic and we focus on the specific aspects of a Mendix model that are relevant for a tester. The full documentation of the Mendix platform for understanding app models can be found in the Mendix documentation pages.
Preconditions
We assume that the reader has Mendix Studio Pro IDE available and that you have downloaded the app model that you need to test. Mendix Studio Pro can be downloaded for free from the Mendix marketplace, Access to the app can be requested to the development team. To download Studio Pro and get access to an app mode you can create a Mendix account for free.
Studio Pro elements that we often refer to in this introduction are:
- App explorer → the tree of all the document types (pages, microflows, nanoflows, domain model, …) of the project. Organized per module in the left pane of Studio Pro
- MenuTopBar → the topbar menu of Studio Pro
- App settings → the top item on the Project browser that contains generic settings for the entire project.
We also advise the reader to follow the Mendix Rapid Developer Course. This course not only gives a first hands-on experience on building Mendix applications, it also gives an insight on the way-of-working with Mendix.
The mendix UI
The Mendix UI: Understanding page (to page) navigation in a Mendix application
The most accessible way to get to know the basic functionality of a Mendix application is by browsing through the different pages. Like any other web application, a Mendix app has a navigation structure with:
- Definitions of the (role based) home page(s)
- Definitions of directly accessible pages from a menu
- Definitions of the pages
- Page to page navigation
- Pages with a direct link (deeplink)
In the “Navigation” item in the Mendix project browser in Studio Pro you can find
- The default home page and home pages for each role
- The navigation menu
The home page(s) and all pages in the navigation menu can be accessed directly from this screen in Studio Pro (use the show button or the “goto target” function with the right mouse click).
If you want to have an overview of all the page definitions in the Mendix model you can find them via
→ TopBarMenu/Edit/Find Advanced [CTRL+SHIFT+F]/Documents/Pages
The resulting list shows all pages as defined in the Mendix model. You can export a CSV file of these pages for documentation purposes.
Page to page navigation from one page to another is possible in Mendix in three different ways
- Via a “show page” button
- Via a microflow or nanoflow that contains an activity “show page”
- Via a microflow URL
Open a Microflow or a nanoflow by right clicking on an item in the page model.
Right click on the open page button or the open page activity in a microflow to navigate to the corresponding page model.
If you want to have an overview of all “open page” locations for a specific screen (or screen layout, like all popups) you can find them via
→ TopBarMenu/Edit/Find Advanced[CTRL+SHIFT+F]/Page open locations
and select the page or page template.
The Mendix UI: Page models
Mendix Studio Pro has a specific document type for “pages”. In the project browser a page model is identified with a page icon. Pages can be stored in any module and in any (sub)folder. The location where the page is stored does not influence the functionality of the page. However, the module in which it is saved determines which module roles should be configured to grant access to the page.
Each page in Mendix has two different page editor modes:
- The page “structure mode” view
- The page “design mode” view
The “structure mode” view is a wireframe that contains all the page elements. It is the technical construction of a page and used by developers to build a page model.
The “design mode” view renders the CSS file(s) and provides an impression of how the actual page will look like in a browser. However, since there is no data to be shown in the Mendix Studio Pro modeler it is not possible to see the actual page. Also conditional visibility settings are not applied in the “design mode”. To have a better overview of all the nested containers that are hard to see and select in the “design mode”, the page explorer can be used.
If you have selected any item (in design or in structure mode), you can see the properties of that element in the “properties” pane (by default this is the right pane in Studio Pro). If you have selected an item in the “design mode” view, you can see a breadcrumb of the encompassing elements at the bottom of the page model in Studio Pro. This allows you to directly navigate to an encompassing table or dataview of the selected element without having to go to the structure mode and back.
Page snippets
In Mendix is it possible to create reusable building blocks for pages called “snippets”. These page snippets can be imported in a page model. A snippet is built with the same elements as a page. However, it will only generate a page at runtime if the snippet is used in a page model.
A snippet has no access roles, since it can be used in multiple pages, and can be recognized by a different icon in the project browser.
A snippet is recognized in a page because it is grayed out. You can directly access the contents of a page snippet by right clicking on it when found in a page.
Attention for testers:
If a page snippet is used in multiple pages it seems that it only needs to be tested once. However since the page in which the page snippet is used can provide parameter values and provides the module role(s) to the snippet it is necessary to test a snippet in the context of the page where it is used. Furthermore, a snippet cannot be accessed directly in the runtime. (Unit) Testing snippets is therefore not possible. Any bug in a snippet however, will be present in all pages that use this snippet. Therefore the chances are high that they are detected and implementing a fix is only necessary once.
The Mendix UI: Page actions & data
How do Mendix pages and API’s interact with the backend?
In order to understand how UI or API based process testing differs from “Direct Model” backend testing it is necessary to understand how page and API actions interact with the Mendix backend. In the figure below we show a simplified schema of the types of interactions that exist between the Mendix Page/API and the Mendix backend
There are several types of actions that a page or API can perform.
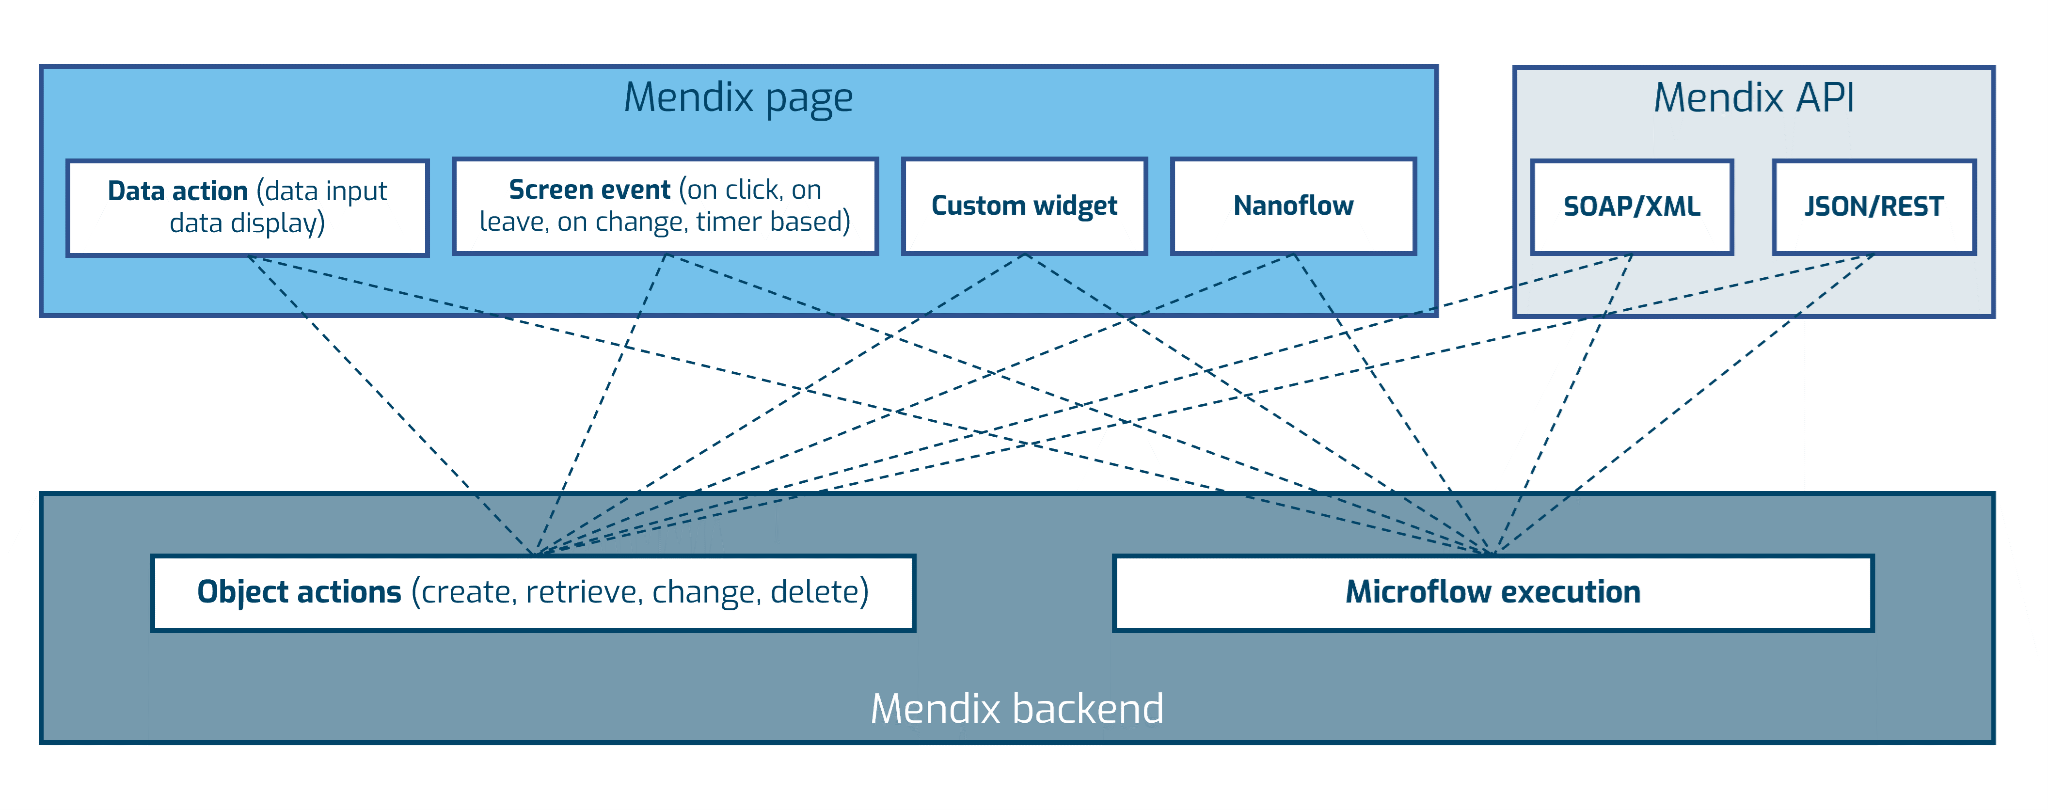
These page and API actions can trigger a Mendix backend action of the type “Object action” (create, retrieve, change delete) or “Microflow execution”. When or how the backend is triggered is configured in the Mendix page and API models. In the Mendix runtime this results in communication between the frontend/API and the Mendix backend.
The most important actions testers should know about, are explained below.
Backend Page actions
The most common page actions that interact with the Mendix backend are:
These can be directly tested with a backend testing tool like MTA
Backend data retrieval
Data that is shown in a page in one of the available data widgets of Mendix that are specified by a
- Data retrieve specification (over association, by X-path or from database (over association))
- Data source microflow (a microflow that provides data as an output parameter)
can be executed by a backend test tool like MTA.
Client data retrieval
Other retrieve (data source) specifications such as
- selection of “listen to widget source”
- selection of “context source
- Data source nanoflow
Can be tested only via the UI. If you want to mimic these client data retrieval actions with a backend testing tool, you need to specify a “retrieve action” which provides similar output.
Client page actions
Client page actions such as
cannot be executed by a backend testing tool, since these actions are executed in the client. However, any backend actions that are executed by a nanoflow such as
- call microflow
- create object
- change object
- delete object
can be set as specific teststeps, to mimic the behavior of the client action as specified in the Mendix model.
The Mendix UI: Triggers of page actions
A page action (client or backend) can be triggered in several ways
- By a button (on click)
- By an event (on leave, on change)
- By a timed event
Furthermore opening a page can trigger the execution of a microflow if the microflow is used as a “data source” microflow for a page widget.
The Mendix UI: Controlling visibility of pages and specific elements on pages
The control over visibility of elements can be controlled by:
- For all pages in a module
- The Module Role, via
- Entity access
- Attributes without read access not visible
- Microflow access
- No access, no visible button
- Page access
- Pages without access not visible
- Nanoflow access
- No access no visible button
- Entity access
- The Module Role, via
- Per page
- The datasource of a page widget can control which data you can see (filter on data)
- Microflow
- X-path constraint
- Association
- Nanoflow
- Custom logic in a (custom) widget
- Setting Conditional visibility per element
- Logic based (expression)
- Attribute based
- Module Role based
- Styling with CSS by hiding specific elements
It is very hard to determine the actual visibility of specific elements, because they rely heavily on data in the database and the user role. Therefore, it is better to test them (manually or with a test tool) via UI testing if they are of (critical) importance.
The Mendix domain model
The Mendix domain model specifies the data structure of the Mendix app. When building a Mendix app it generates a database.
A domain model consists of entities, associations and attributes. With these three elements the developer can create the structure of the data of the Mendix application.
In the domain model you can also define the
- Access rules for entities, associations and attributes. These access rules are always enforced. Only microflows without “apply entity access” can bypass these access rules. The default when a new microflow is created is that no entity access is applied.
- Delete behavior of associations. The delete behavior of associations is always enforced by Mendix.
- Validation rules on objects. These validation rules are always enforced. If you want to use conditional validation rules you have to use microflows to build this logic
- Event handlers on objects are always triggered on an event. If you want conditional triggers you need to build it with microflows
The Mendix platform takes care of most of the domain model behavior. Testing whether the specifications in Mendix Studio Pro matches with the generated database and database rules is done extensively by Mendix R\&D. There is not much to test on the domain model for a tester, except for checking whether it is properly configured in Studio Pro. This is, of course, not true for any microflow that is triggered from domain model events. These microflows are specific for the Mendix application and need to be tested separately (as units)
Attention for testers:
When changing the structure of the data in the domain model, Mendix will automatically create a new database structure. Existing data in the database needs to be migrated to this new structure. When Mendix cannot do this automatically a migration script needs to be executed to migrate the data from the old to the new structure. This migration script needs to be tested carefully.
The Mendix domain model: direct interaction between pages and the domain model
In Mendix it is possible to create, retrieve, change and delete objects directly from the pages by using specific page actions. These actions interact directly with the domain model and do not use any microflow (or nanoflow) logic. The integrations of these actions with the domain model are thoroughly tested by Mendix and do not need to be tested in your application anymore. Any configuration errors at this level will show up as consistency errors in Mendix Studio Pro.
However, in the UI, a tester cannot distinguish a “Mendix save” button from a “Custom Save” button that uses custom microflow logic. When opening the Mendix model in Studio Pro this difference is clearly visible and can help to reduce the test effort.
Attention for testers:
If, however, objects of the same entity are stored both via Mendix save buttons and via Microflow save buttons (in different pages) the tester needs to pay careful attention. In this case the likelihood that objects that are not compliant to any business rules can be stored or deleted from the database increases because:
- a microflow can bypass entity access whereas the Mendix page actions cannot do this
- the microflow logic can be different (more strict) than the logic on the domain model
Mendix backend logic: Microflows
Microflows explained
A microflow is a visual representation of application logic in a Mendix model. A microflow has (optional) input parameters and a return value. The logic in a microflow is created by creating a chain of activities.
Microflow input & output
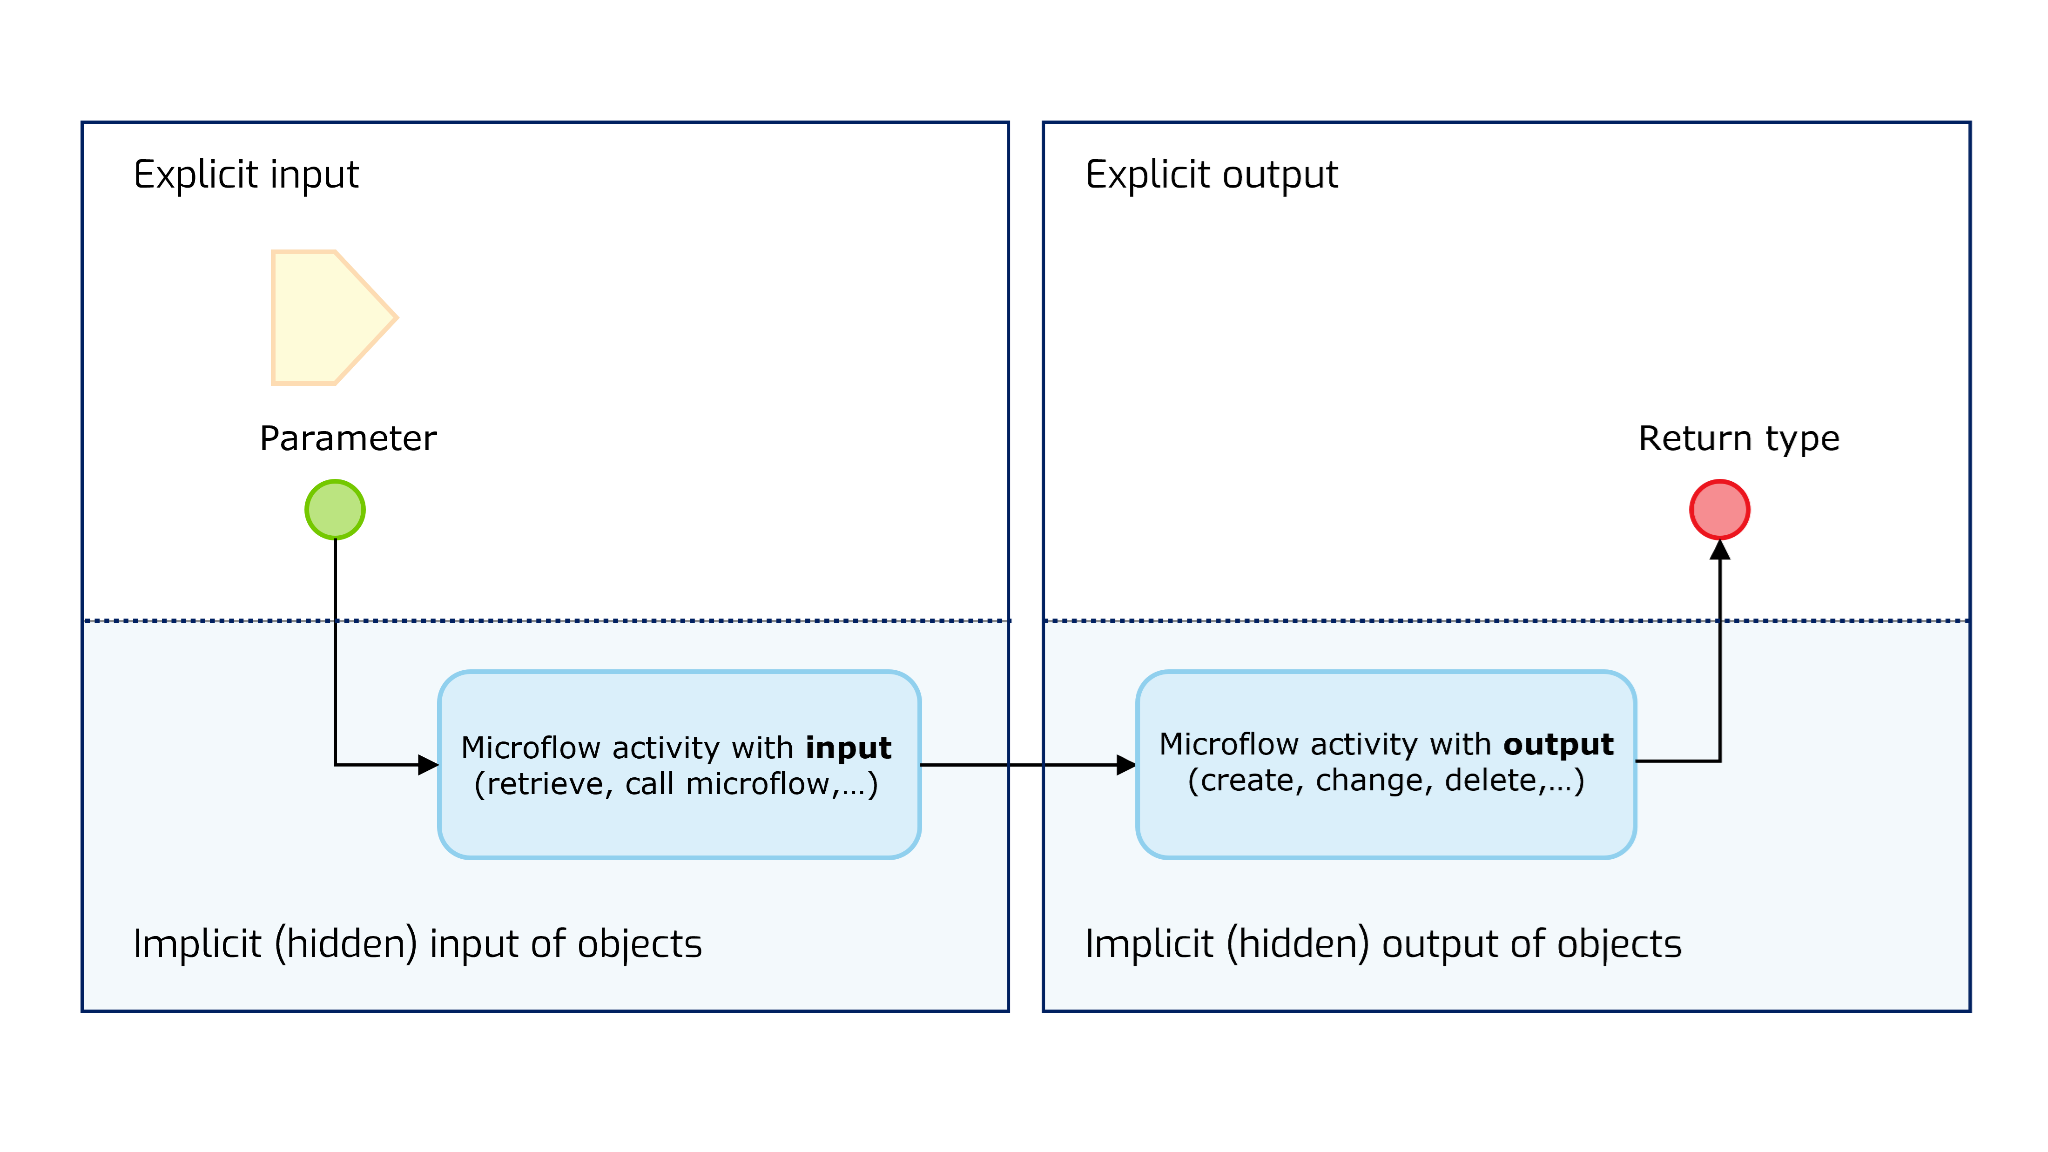
Explicit input and output: parameters & return type
A microflow can have explicit inputs via parameters. Microflow parameters can be objects, a list of objects or primitive values. A microflow also has one return type. A return type can also be an object, list of objects or a primitive value.
Both microflow parameters and return types are explicit inputs and output, because they are exposed to other elements in the Mendix model (e.g. pages, other microflows,...)
Implicit input and output
However, from a testing perspective it is relevant to know all “input and output” of a function. In the case of microflows this can be quite a lot. Implicit input for a microflow can be for example:
- Retrieve data from database (or memory)
- Call another microflow (that can do a retrieve or call another microflow)
Implicit output of a microflow can be for example
- created object(s)
- changed object(s)
- deleted object(s)
Analyzing the full implicit input & output of a microflow can be complex and time consuming if the microflow is not well structured (not testable). Microflows that are suitable for unit testing have as little implicit inputs and outputs. This makes their behavior more predictable and easier to test.
Microflow actions
A microflow consists of microflow actions and activities. There are two types of activities that are particular relevant to testers
Object related activities that lead to persisted data in the database (activities followed by a commit). These activities are relevant, because they lead to persisted data in the database. Polluted databases are the most complex to troubleshoot in case a bug is found.
Activities that lead to the triggering of other application logic (action calls)
- Call a (sub) microflow
- Call a java action (logic written in Java instead of in a microflow)
These types of activities create logic within logic and make the exact behavior of the logic harder to analyze and therefore harder to test.
Microflow triggers
Microflows can be triggered by several events
- UI based triggering
- Backend based triggering